
Inverter Monitor
This app started out as just a monitor. When I started to develop features to change settings on the Inverter I was concerned that it might be misused, and that I might even become liable.
Imagine little Johnny comes to visit Grandad and Grandma. The equipment has GivEnergy printed boldly on the front. What if little Johnny googled GivEnergy and found a free app to download and used it to reprogram Grandad's Inverter. And if Grandad didn't realise until a large energy bill arrived, and then the truth came out. Grandad might be surprised that there was a free app that bypassed the logon security that his official app has, and might (justifiably?) think the author of said app was liable. Now, of course, if Grandad had given little Johnny a bank card to buy something on the internet, that would change the liability somewhat.
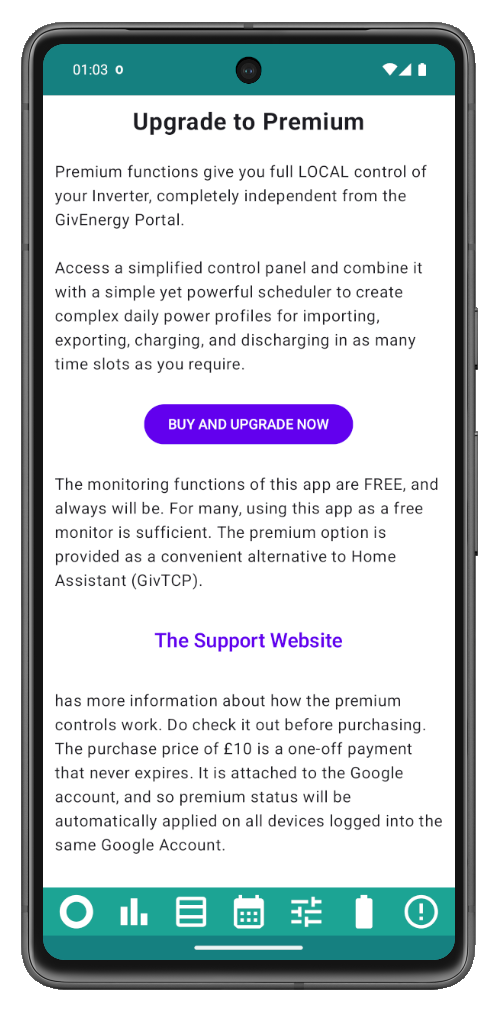
As a responsible developer, I don't want anyone to come to harm as a result of my work, so there is a small charge to protect these powerful features. Google takes a commission from every sale, and for each £10 purchase I normally receive £7.08 which I put on my Tax Return and pay tax on. Charging more would increase Google's commission, and result in me having to pay more tax. So the price is £10, it will always be £10, and I don't have promotions (although Google might) because in a fair world everyone should pay the same.
When I set up this "in-app product" [that's what Google calls it] I remember ticking a box to allow refunds. Some online purchases, such as movie rentals, or a Level 5 Sword of Invincibility for a game, cannot be refunded. This app doesn't fall into that category, so rest assured if it doesn't meet your needs you can get a refund, within a certain time limit set by Google. When you make a purchase you should get a confirmation email from Google, which has instructions and possibly a link for obtaining a refund. Alternatively, if you open the Play Store app, open your account, select Payments and Subscriptions, then Budget and history, you should see a list of your purchases and request a refund from there. By my understanding, the premium functions may continue to work for up to 7 days after a refund is issued.
Android phones and tablets normally check in with Google at least once a day, for a variety of reasons including app updates, reporting apps that crash, and checking the status of in-app purchases. Logically therefore, if your phone is unable to connect with Google for 7 days, it won't be able to determine if purchases have been refunded or not. This may cause the premium controls to become inaccessible. Simply reconnect with the Google Play Store to get things going again.
This section covers the original (Hybrid Gen1, Gen2, and AC3) system designs. Don't skip this section just because you have a newer design, the next section covers the newer designs in more detail, but they build on the old design so the information here is still valuable to know.
Batteries only do two things, they charge and they discharge. Perhaps you could say they also sit idle too, but that's all. Other things, like powering your home or exporting surplus power happen as a consequence of what the batteries are doing.
Most systems typically run with ECO mode on. This is usually the best setting to minimise your energy usage from the grid. Power from solar panels (if you have any), first powers your home, then charges the battery, then any surplus gets exported to the grid.
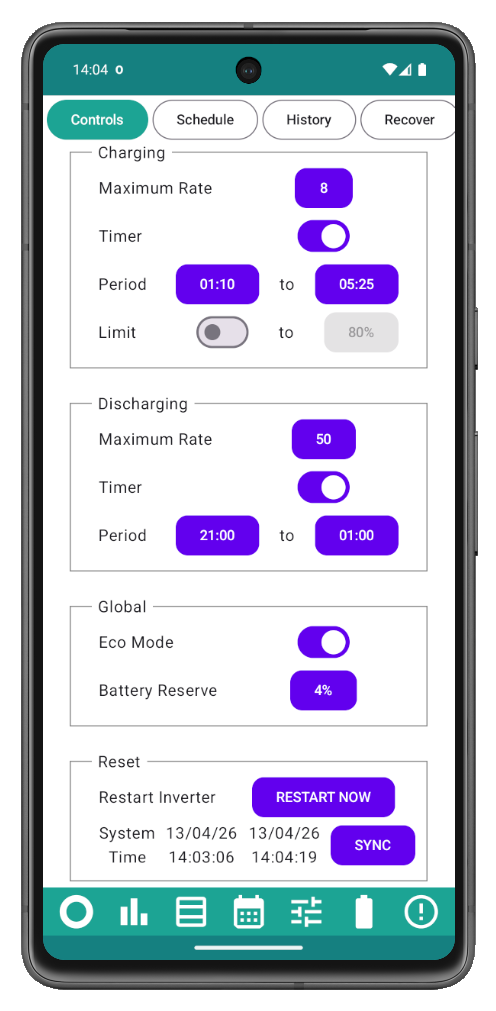
The Maximum charge (and discharge) rate works like the volume control on your telly. It's just a number. How much power a given setting represents will depend on the model of your system and the type of batteries. In the image, the maximum charging power is set to 8. On one system this could be 500W and on another this could be 1,200W, it doesn't matter just know that the higher the number the higher the power. The maximum is 50 and setting it to 50 will always give full power, however for many systems lower values will also give full power, for some systems any value above 30 gives full power.
Setting the maximum charge rate to 8 does not mean that the battery will charge at that rate. It is a maximum, so if the sun isn't shining the battery won't be charging. When the sun comes out, power is first used to power your home, then used to charge the battery until the maximum rate is reached, and then surplus power will be exported.
Charging also has a timer, which can typically be used to charge the battery overnight with cheaper rate electricity. If you pay the same price for electricity regardless of time of day, there is no benefit to using the timer.
With the timer enabled, during the set period the battery with charge at the rate set by the maximum rate. It will first use any solar energy (unlikely at night!!) and then draw energy required from the grid. During this charging period, your home will also be using electricity from the grid, which is a good thing because it will also be at the cheaper rate.
Overnight rates may be cheaper, but they are not usually free, so it can make sense to only charge the battery overnight to a certain level and then let solar finish charging it to full during the day. To do this enable the limit and set the value you need. Once the charge reaches the set limit, the battery will go idle and remain at that level until the end of the charge period.
It is possible to set a maximum rate for discharge, but in almost all cases it is best to just leave it at 50 (the maximum). If you were to reduce the discharge rate, then when your home needs power, for example to boil the kettle, the battery may not be able to supply enough and the extra would need to be drawn from the grid at a cost.
Using the discharge timer only makes sense if you have a tariff where the export rate changes with time of day or the export rate is higher than the lowest import rate. This can be true on the Octopus Flux, Go, and Agile tariffs. It works similar to the charge timer, but the actual effect depends on firmware version. For 400 series firmware, the discharge timer is ignored in ECO mode where the battery just continues to meet the home demand, and in order to discharge at the maximum rate ECO needs to be turned off. For other firmwares, during the discharge period the battery discharges at the maximum rate regardless of the ECO setting.
The discharge timer has no limit setting because it wouldn't make any sense. Once the battery reached the limit, the home would draw power from the grid at a peak price.
ECO mode is usually on, turning it off means that the battery does not discharge to meet the demands of the home. Therefore with eco off the home is powered either by solar or grid power.
With ECO on, a reserve can be set. This is only useful if you can use stored battery power during a power outage. With ECO off, a reserve makes no sense because the battery does not discharge.
The control system is in effect a type of computer. Sometimes computers go a bit haywire and need a reset or reboot. There is a button to restart the inverter when it is behaving in an unexpected way. Try the restart button first and if that doesn't fix the issue the next stage is the infamous "turn it off and on again".
The only use of the clock within the inverter is for the charge and discharge timed periods. If you don't use the timers, then the clock being wrong won't matter. If necessary you can synchronise the system clock with the time on your android device.
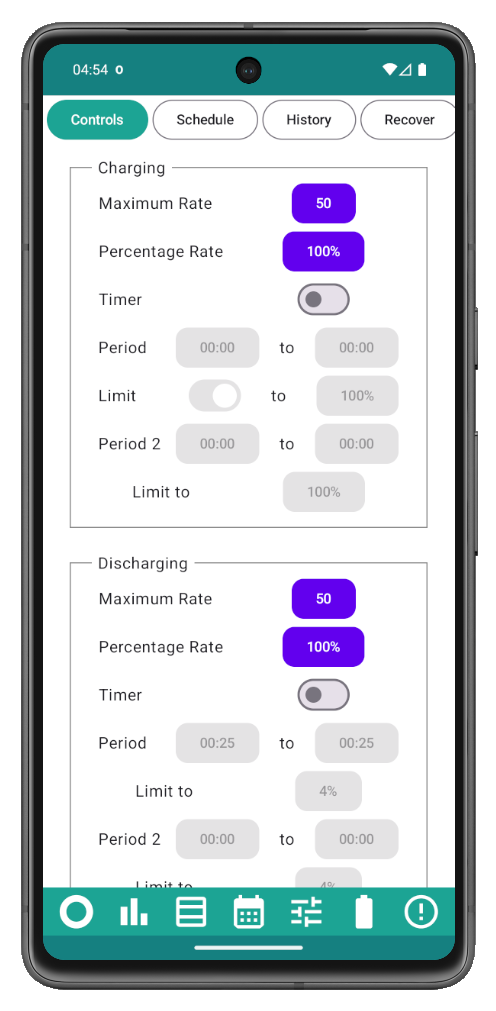
The controls on newer systems (including the hybrid gen3, the AIO, and the HV hybrid) are a little more complicated but follow the same basic format as the original designs.
On some newer systems the charge (and discharge) rate goes from 0 to 100 rather than 0 to 50. Apparently the designers thought that using the old control and multiplying by two was too complicated, so they added a completely new control. Some systems use the new control and some still use the old one. I don't know which systems use which control, so the best I can do is offer you them both and you will have to figure out for yourself which one works on your system.
The newer systems support ten charge and discharge slots. In fact the original designs were supposed to have two slots, but only one worked, and that's another story. When the extra 9 charge slots were added the designers seemed to have forgotten that the old systems had a limit setting, so the new designs have 10 start times, 10 end times, and 11 limits! I have done my best to pick the right controls and hope that they work for you.
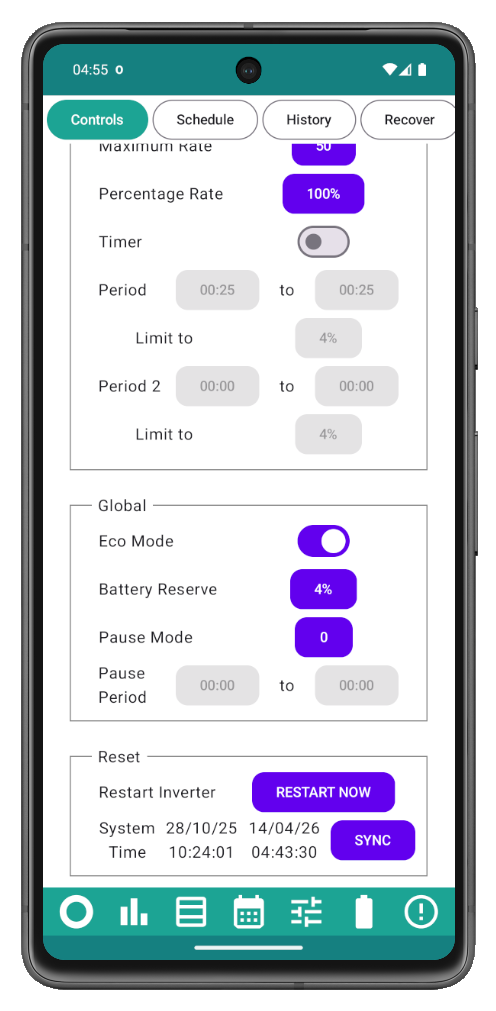
Two slots are shown to start with, once you put times into the second slot, a third one will appear.
The ten discharge slots now have a limit each, although I can't see any use for it. Because the original design (in my opinion correctly) didn't have a discharge limit, the new design has 10 limits.
With the old design, you could effectively pause the battery either by turning ECO off, or by setting the charge and discharge rates to zero. Those methods still work, and the new design adds a pause facility, with 3 different modes. The pause mode settings are:
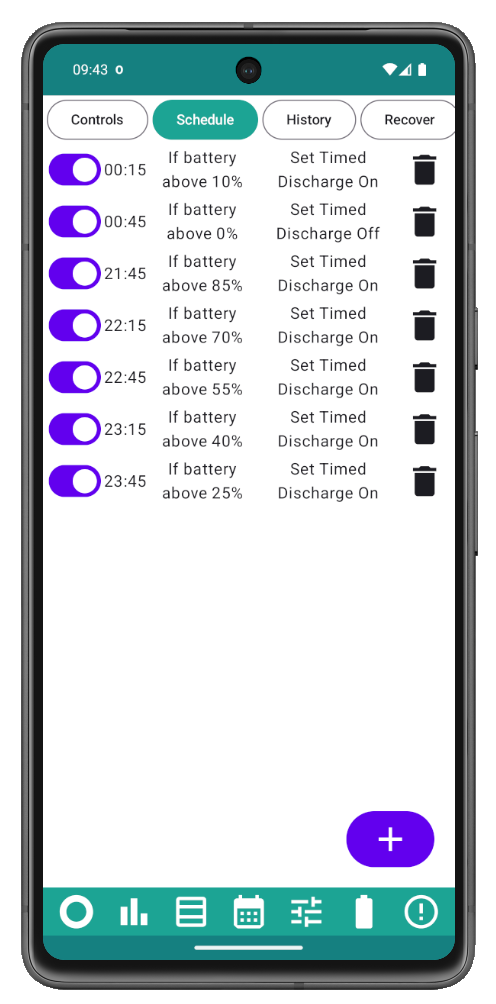
The schedule allows a control to automatically change at a set time, just as if you had changed it yourself. The control will only change if the given condition is met, currently the only condition available is if the battery is above or below a certain level.
The example screen here shows how a schedule could be used to empty the battery at the end of the day ready for recharging overnight. There are more examples of how the scheduler can be used on the Smart Tariffs page.
Whenever a setting is changed by this app, either manually or automatically by the schedule, the change will be recorded in the History log. If a scheduled action doesn't occur because the condition isn't met, then it won't be recorded in the History. The History only records changes made by this app, it will not record changes made thought the GE app, GE portal, other apps, nor Home Assistant. If you have this app installed on two devices, for example a phone and a tablet, the History on each device will only record the changes made by that device. To avoid confusion, it is best to only set up a schedule on one device and make any manual changes through that same device.
Every entry in the History log will have an outcome recorded. The possible outcomes are:
For any results you see in the log, other than the first two, it is worth checking to see what actually happened. Hopefully you will never see these errors.

Sometimes things stop working, or at least stop working how you expect them too. There can be many reasons, ranging from simple operator error through to complete mechanical or electrical failure.
For most computer-type systems, including solar inverters, the first step should be to try restarting or rebooting the system (using the control tab as noted above). If that doesn't help, the next step might be to try turning it off and on again; for GivEnergy systems your installer should have left you a procedure appropriate to your system.
The next step is to examine the settings, and for GivEnergy systems there is a wide variety of settings that can cause problems.
When you purchased the Premium Option, the app automatically stored a backup copy of the settings at that time. The presumption is that your system was working at that time. So now the Recover tab can compare the current settings against that backup copy and list any differences. You can check each difference, and if you find something that doesn't seem right, then you can put it back to how it used to be.
Although this might seem to allow you to change things you shouldn't ought to be able to change, such as your export limit, it doesn't allow you to set anything to any value you want, only back to the value that it used to be.
Hopefully you will find that putting settings back will cure your problem and restore the system to working order. But if not, and your system has indeed suffered a catastrophic failure, the Recover tab has another use too.
If your system has to be replaced, perhaps with a second-user or reconditioned unit, the replacement will likely have some different settings to your old system. Once you have everything up and running, the Recover tab can be used to transfer your old settings onto the new equipment.
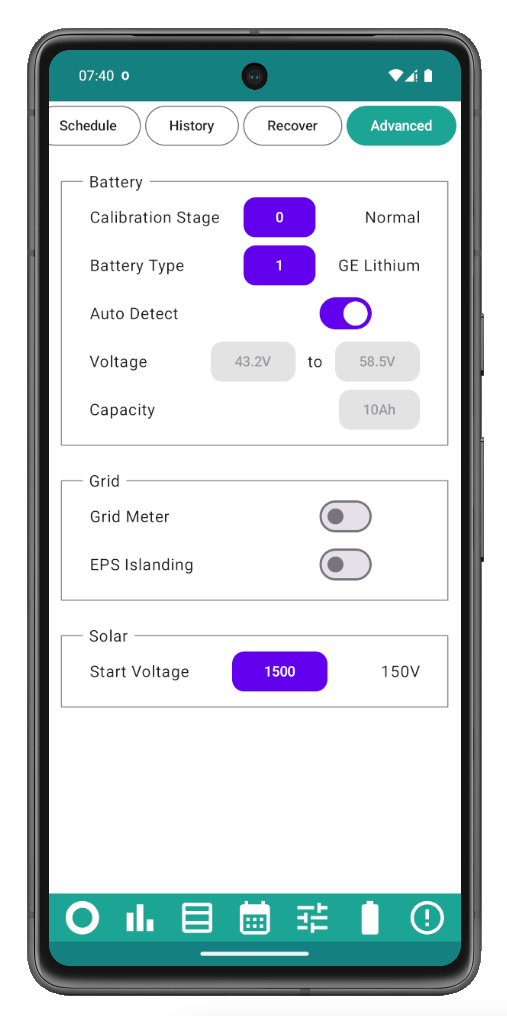
If you are using a phone (in portrait orientation) you may need to scroll the tabs at the top to reach the Advanced tab.
Unless you want to tinker with batteries, the only control you might need here is Calibration. To run a normal (full) calibration set the calibration stage to 1. Calibration should proceed sequentially through the stages automatically and finish by itself.
Setting the calibration stage to a value other than 1 may be useful if the calibration gets stuck, or if you are trying to repair a damaged battery. The effect of setting a particular calibration stage is not clearly defined, and you do so at your own risk. Just because you can do something doesn't necessarily mean that you should.
That last statement applies particularly to the rest of these advanced battery controls. These controls are provided to allow anyone with the knowledge and capability to connect additional batteries to their system. Similar controls are normally exposed by other manufacturers such as Victron, so this is nothing out of the ordinary. They are not intended for use with high voltage batteries.
With GivEnergy batteries, after having charged them all to the same voltage, set the dip switches correctly, connected the data cables, and earthed them safely, set the battery type to 1. Then turn on auto-detect to retrieve the capacity from the batteries, and then turn auto detect off so that the system doesn't reconfigure when a battery fails. With other makes of batteries, you may need to set battery type 0 and configure the voltage and capacity in accordance with the manufacturers instructions.
Note: When you use auto detect you may see the status "Corruption" in the History log. This is because the app is changing the auto detect register, but the capacity register changes by itself. The app is simply detecting that the wrong register seems to have changed.
GivEnergy systems normally operate in conjunction with a grid meter, and the grid meter setting should be On. Turning the grid meter off allows an inverter to run without a grid meter being connected. If you have multiple inverters, make sure the first one configured in the app has a grid meter so that the home load can be detected correctly. If you choose to run a (secondary) inverter without a grid meter, then it is your responsibility to control the power and not exceed the limits set by your DNO.
The function of EPS Islanding is not clear, but may have a beneficial effect in providing backup power, particularly on AIO equipment.
The Solar Start Voltage can be reduced to 120V if you have 4 panels or less, however the results may not be very satisfactory. The start voltage can also be increased but the benefits of doing so are not clear.